Hugo with the flow
Effortless website building
When it came time to build the blog part of my site, I was faced with a few requirements that needed some careful thought. The first of which was how i was going to handle lots of continuously evolving blog posts, over multiple themes that may end up being mirrored on duplicate sites.
I initially considered an SPA approach, however i realised this would soon become cumbersome using vanilla JS, and would make for a very bloated html file.
Given that, I decided to go with an MPA approach. I also wanted features like tagging, inter-page routing, but most importantly, i wanted the ability to write blogposts in Markdown files, which could then be uploaded as websites. Enter the Static Page Generator!

After doing some research I landed on Hugo, which is written in Go and is (supposedly) blisteringly fast, and well-supported in terms of templates and docs, and will automatically build a static blog site from a folder full of markdown files (and some html/css/js templates).
Here's how it went.
Firstly, I had to use homebrew to install Hugo.
brew install hugo
Once installed, I started a new Hugo site with the command:
$ hugo new site site_name
This was painless, and set me up with a skeleton of folders that would be used to build the blog microsite.

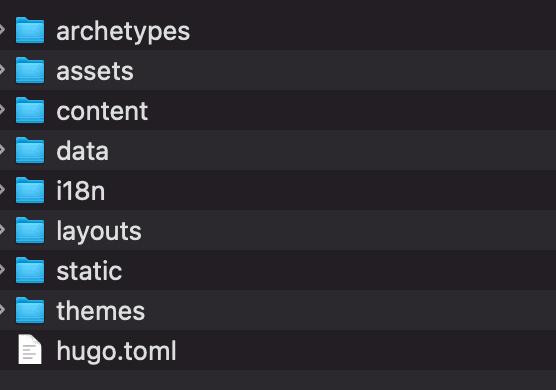
This folder structure is the skeleton of an entire static website:
Archetypes:
Content templates that come with pre-set frontmatter variables. You can customize these templates or create your own to suit your needs. For instance, if you want a template specifically for blog posts, you'd create a file named "posts.md" in the "archetypes" folder. Hugo will then automatically apply the variables from this file whenever you generate a new post.
By default, they come with 'title', 'date', and 'draft'. This ensures that every new post includes these essential fields.
To use this post template, I simply run the command:
$ hugo new posts/new-post.md
This creates a new blank post in the content/posts directory with the frontmatter values pre-populated.
Content:
This directory is where all the website's content is stored. You can organize it with subfolders that represent different sections of your site. For instance, if your site includes a blog, you could create a "blog" folder to hold all the articles for that section.
Data:
I haven't used this (yet), but you can populate it with JSON and other data files from external sources, and then pull that data into your Hugo static sites.
Layout:
Perhaps one of the most important folders, this contains all the HTML template files used for pages on your Hugo site. For example, single.html is the template for every blog post, and baseof.html is the base template that's used across all your sites.
Static:
The static directory is quite simple—it holds the static assets for your website, like CSS, JavaScript, and images. The contents of this directory are served exactly as they are, without any modifications by Hugo.
Config.toml:
The basic configuration file for any Hugo project. It can also be created as a JSON or YAML if you prefer, but the concept remains the same. There is a wide variety of directives that ship with Hugo which can be used that will enable you to fine tune your environment. Most projects will have a single config file which will reside inside the root of the project but for larger projects you can create a config directory which could contain multiple config files for various purposes or environments such as staging and production.
Hugo creates two additional directories after you've built your project for the first time:
Resources:
A cache of images and css files, to help your site load faster.
Public:
All of the public-facing files Hugo generates - the production folder you'd use in order to launch your project on the internet.
Additional setup:
I knew I wanted to integrate my Hugo outputs with an existing site, and so I needed to have a continuously updating JSON output of all of my blog posts. Luckily, Hugo offers this, and I added this to my config.toml file:
[outputs]
  home = ["HTML", "JSON"]
  section = ["HTML", "JSON"]
  taxonomy = ["HTML", "JSON"]
  taxonomyTerm = ["HTML", "JSON"]
My use case for Hugo was atypical - its most commonly used to launch an entire website, rather than a subset of an existing website. But it worked well.
I started out by building the empty template files - Hugo has a bunch of off the shelf themes, but given my main site was already built, i instead had to copy across the CSS and the existing header and footer html.
This gave me empty pages that shared the nav bar and footer from my existing site

The next step was to test it with some markdown files. I had a few blog posts prewritten on my phone. I try and write them on the tube as its a good distraction from the sauna that is the Victoria line.

It worked perfectly - I can now just either deposit a premade markdown file in my content/posts directory, or use the terminal to create a blank once, fill it with content, and then run a single command to have it converted into blog post (typically in less than 20ms).
It did take me a little while to figure out the best way to handle embedded images. Hugo has lots of different options for handling them, but a few of them are cumbersome and require writing long relative file paths. The best way to set up your blog images (in my humble experience) is to create a folder for each blog post - if you do this, you can put any embedded images directly in there, and then reference them directly with no file paths:
<Figure
  src="/images/blog/hugo/example.jpg"
  alt="an example"
  title="Some kind of pithy comment here"
/>Integration station
The next step was integrating it with my existing site, which I was nervous about as I'm not exactly using Hugo exactly how it was designed - it's designed to be an entire static website generator. Given my main portfolio website is a single page, I figured there were several ways I could tackle this. I didn't want to just have it sat behind a link in a nav bar -- I wanted to surface articles on the existing static page. Step in our old friend, the JSON.

Hugo has a JSON export function -- you can use it to set up a templated JSON export that automatically runs every time your Hugo site compiles. This includes an array of blog posts, with lots of helpful fields surfaced. Here's how I set up my JSON template:
{
  "version": "https://jsonfeed.org/version/1",
  "title": "{{.Site.Title}}",
  "home_page_url": "{{.Site.BaseURL}}",
  "feed_url": "{{.Permalink}}index.json",
  "description": "{{.Site.Params.description}}",
  "items": [
    {{- $pages := where .Site.RegularPages "Type" "in" .Site.Params.mainSections -}}
    {{- range $index, $page := $pages}}
    {{- if $index }}, {{ end }}
    {
      "id": "{{$page.RelPermalink }}",
      "url": "{{$page.RelPermalink }}",
      "title": "{{$page.Title}}",
      "context_text": {{ $page.summary | jsonify }},
    }
    {{- end}}
  ]
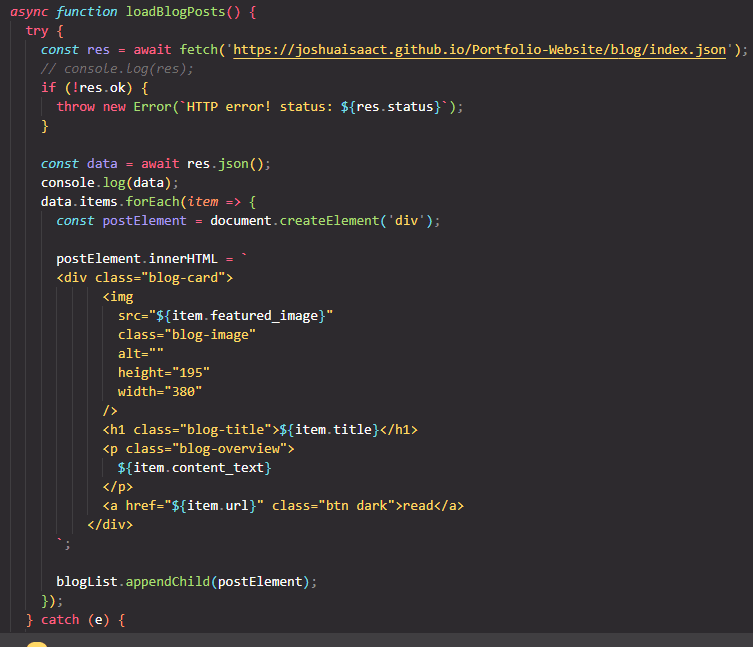
}With this JSON, I could then enlist the help of a very dear, very old friend -- the IIFE div generator function! Using this, I can automatically create a grid on my main static site, automatically populated with my most recent blog articles.

Here's how I structured my function:

And with that, I had Hugo set up and ready to roll! There were a few other fiddly bits to sort, like taxonomy, tagging, and local/production variables, but I'll save those enthralling tales for another day.
In summary - Hugo is great, I couldn't recommend it more as a static site generator that automates lots of the tedious parts of managing a website - the routing, page generation, and copy/pasting of page after page, and let's you focus on what's most important -- writing dumb blog posts and making sick skins.
If you're reading this on my new portfolio site, dear reader, I'm ashamed to admit I've migrated to Next's inbuilt SSG features, primarily because I wanted to use MDX files. Sorry Hugo!.
